Friday, July 18, 2014

Embroidered Critter Pillow :)


Welcome back!

I hope you've all been practicing your embroidery skills, because this week we'll be making a super fun embroidery project. :-)

My project inspiration came from an adorable skunk pillow 
I found in Sew & Stitch Embroidery, by Alyssa Thomas. 


Cute, right??  I love the idea of a basic shape, requiring basic cutting/sewing skills, with the details coming from embroidery.

I decided to combine this idea with the little fox I made earlier this year.... Every pillow needs legs, right?


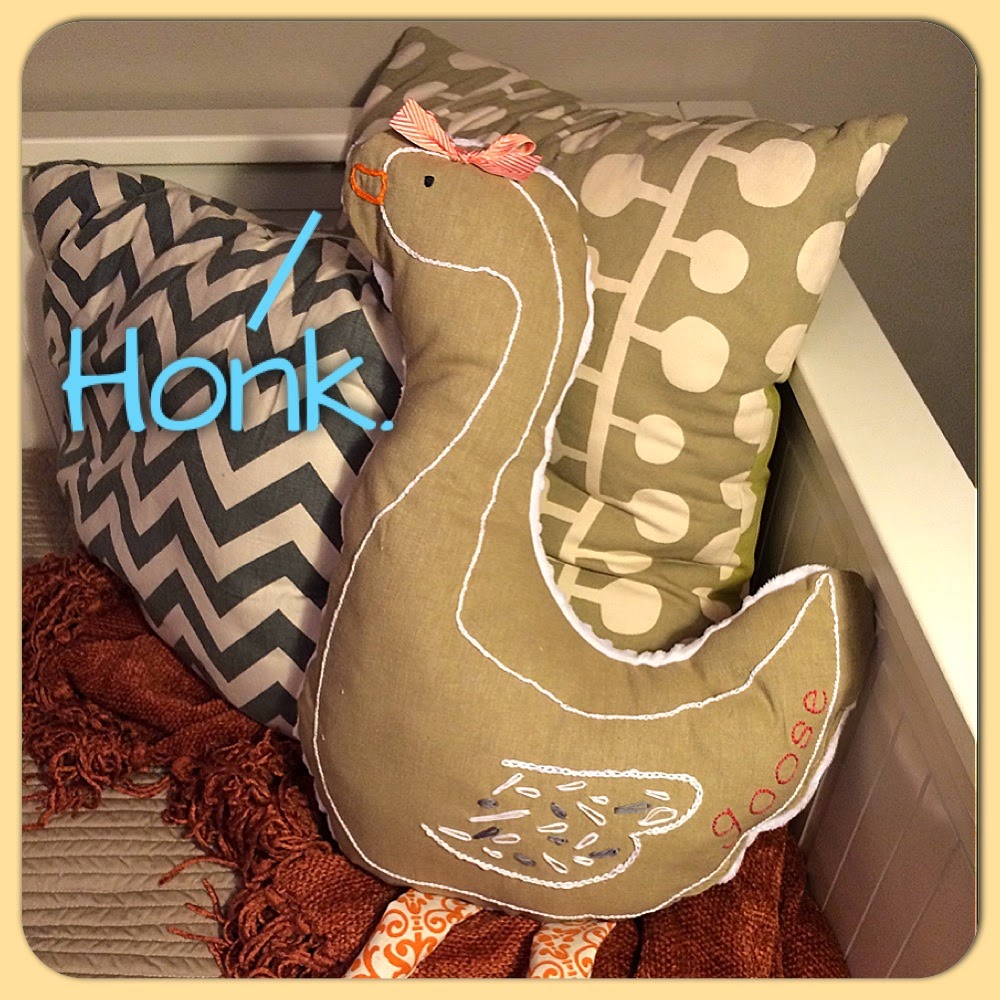
I made this project for a special little lady who turned 1 this week... I figure if your nickname is "Goose", you should also have a soft squishy goose for a friend.

So, here we go!

First thing's first... pick your fabrics.  I raided my fabric stash for this one to avoid the risk of going bananas in a fabric store. :)

I wanted a sturdier cotton fabric for the embroidered side of the pillow, and a soft minky fabric for the back.  You can embroider on any fabric, but some are easier than others.  Soft or stretchy fabrics like minky require stabilizers to keep your stitches from becoming uneven and wrinkled.  The books I mentioned last week have good information on the different stabilizers available if you go that route.  When I can't figure out what I need, I also find the staff in fabric/crafts stores to be really helpful. :)

Ok, with your fabric selected, it's time to draw your design.  I looked at some clip-art photos of geese, and drew the basic shape with pencil on the fabric.  You can use a washable or disappearing ink fabric marker to go over it.  Since I had to draw it a couple of times, I decided to use a permanent marker to go over the lines, so that I could embroider on the opposite side of the fabric.  That way I could hide all of my pencil lines.


Now, pull out your hoop--it's time to stitch!
(I used crochet thread for the white outline and embroidery floss for some of the feathers, the beak and the wording.)
  

I used a split stitch for the outline and beak:


Chain stitch for the wing outline, and single chain stitches for the feathers (this is the same stitch to make a lazy daisy stitch):


French knot for the eye:


Backstitch for the "goose":


Now it's pretty much done!


PS: Check out the post from last week for a refresher on these stitches!

*Note: I used an iron to remove the creases from the hoop, but try not to iron directly over your stitches. If you do, you might lose the pretty 3-D effect of the stitches. :)

Of course, she needs an accessory.... sew on a ribbon bow, and she's perfect!


Now for the legs.... (this is exactly what I did for the legs in the stuffed fox post. )

Draw and cut 4 identical pieces.


Sew them with right sides together, leaving the top open.


Turn inside out, stuff, and done!


Now you're ready to assemble!

Cut out the fabric for the back of the pillow, making sure that the right sides of the fabrics are not facing in the same direction when you trace.

Pin your fabrics together, right sides together, and also pin the legs.  Make sure the "toes" are on the inside of your pillow, so that when you turn it out, the legs will be going the right way.  


Sew away!


Remember to leave an opening as you sew the perimeter, so that you can turn the pillow inside out.


Stuff the goose!


Now you just need to sew it closed, and you're done!  I decided to try to use the machine to close this seam, but I definitely would have gotten a straighter seam if I had hand-sewn it.  :)  Laziness has its draw-backs, but I'm ok with that. :)


Ok, she's done!


You can make a fun pillow friend with any shape, and any animal embroidered on the front!  Be creative and have fun!


Also, before you get started, find yourself a great, supportive chair with lighting to shine over your shoulder as you embroider!  Otherwise, you can be sure you'll need to visit your chiropractor after you're done. :) Trust me.

Thanks for reading, have a great weekend!

Friday, July 11, 2014

Intro to Embroidery


Hello all!

This week, we're going to take a little look into the fun world of embroidery!  
.... If that sounds awful, hang in there... I promise it will be fun!


So, do you remember cross-stitching an owl in your 6th grade home economics class? (Does home ec. still exist??)
If you do remember it, and hopefully it brings back happy memories ;), then congratulations!  You already know the basics of embroidery!  

For me, embroidery is a way to make things more beautiful, more personal and more special.  You can create something to embroider, or embellish something beautiful that already exists!  Today, I'm going to give you some resources for learning how to embroider and a quick intro to what you'll need to make it happen.  

Note: There are so many hi-tech sewing machines available that make detailed embroidery quick and simple, but I have to admit that I'm partial to hand-done embroidery.  I promise, it's easy (and way cheaper than buying a machine to do it!) ;)

First, I want to share with you some books that have been incredibly helpful (and inspirational!) to me. I have a wonderfully talented friend who inspired me to jump into embroidery, so I have to say that she is my greatest resource!  But, since I couldn't text her questions 24/7, I checked out a few written resources. :)  
I think these books are pretty fantastic.


Embroider Everything Workshop, by Diana Rupp
This is the first written resource I came across in the book store. The cool thing about this book is that the author does a fantastic job of breaking down and explaining each type of stitch, and even includes reusable iron-on transfers with the patterns for her fun project ideas.  I LOVE this book--- if you're interested in embroidery, please check it out! If you live near me, you can borrow mine!


Stitched for Fun, by Fiona Goble
Seriously?  I'm totally sold by the cover.  :)  This book is full of completely adorable embroidery ideas for home decor projects and gifts.  I love her creativity!


Sew & Stitch Embroidery, by Alyssa Thomas
Oh.  My. Goodness.  I cannot handle the cuteness in this book.  Check out the table runner on the cover.  Don't you need a fox table runner??  
OF COURSE YOU DO.  
I absolutely love her ideas--- this is proof that embroidery can be modern, fresh and incredibly fun.  You're only limited by your imagination!

Ok, once you have your books and your inspiration, you need supplies!

--------------------------------------------------

Embroidery floss is so good for the soul.  You can find it in every color of the rainbow.... and it is incredibly inexpensive... like $0.30 inexpensive.  So go ahead, stock up.  :)
The colors are numbered, so if you have a specific project that tells you what colors you'll need, you'll be able to find them easily!  If you check out the first book I mentioned, she does a great job explaining the kinds of thread/floss you can find and what to do with them.

Ah, the possibilities. 


--------------------------------------------------


Hoops!  These come in all sizes, oval or circular, made of wood or plastic, to secure your project and suit your needs.  These are pretty inexpensive, especially the wooden hoops. Bonus--I love embroidery as art, hung on a wall in a hoop. Lovely!  You can totally make one of these!


--------------------------------------------------


Embroidery needles are another piece of the puzzle, and, of course, they come in a variety of sizes for different project.  These are the needles I use the majority of the time; they are just a bit more dull and have a bigger eye than your typical needle for sewing.

 --------------------------------------------------

Next, you can check out the embroidery/ needle arts section of your local craft store for some awesome iron-on transfers.  You can always trace or draw your own pattern with a fabric marker/pencil (I do that a lot); or you can use these super fun, ready-made iron-on transfers.  I remember my mom using these Aunt Martha's transfers when I was a kid for all kinds of projects, so they're definitely sentimental to me.  You can still buy Aunt Martha's retro-fabulous patterns, but there are even more available on the shelves now... be inspired!  All you need is an iron, and you're all set!  Obviously, these iron-on transfers work better on lighter-colored fabrics.  Once you iron the pattern, you just have to "trace" over the lines with your needle and thread!


--------------------------------------------------


Now, there are certainly more fun tools you may want, but with these basics (plus a pair of good, sharp scissors), you're ready to get started and try your hands at embroidery!  Check out the books I mentioned for more information about the tools of the trade. :)


-------------------------------------------------


Stitches
Now you're ready to give it a try!
Here are some good you-tube instructions for some basic stitches, if you're interested!

Running Stitch:


Backstitch:


Split Stitch:


Chain Stitch:


Stem Stitch:


Satin Stitch:


French knot:


Ok, that's a lot of information, but hopefully it will be a good reference for you!
Get creative, and start playing around with embroidery-- you'll love it!  
It's one of my favorite ways to "unplug" and clear out my frantic spaghetti brain. :)

Here are some examples of fun and relatively quick projects I've worked on lately!
Monogrammed Napkins, Personalized Baby Blanket,
Wedding Handkerchiefs

Apron Embellishment

Pillowcase Personalization 

Thanks for reading!  We'll be working on a fun gift next week!


Tuesday, July 1, 2014

Patriotic Paper Pinwheels

Happy Independence Day Week! :-)

Since the 4th is rapidly approaching, and we all have a date with ESPN at 4pm today to cheer on the US men's soccer team, we're doing a craft quickie today to celebrate the stars and stripes. :)


I think these are just what you need for you futbol viewing party today! 

Or, think about making a few of these cute pinwheels to put in your flower pots or on an adorable wreath like this for the 4th!


Ok, ready to make some fun and easy pinwheels?
Let's do it!

Materials:
Paper
Ruler
Scissors
Thumb tack or small hole punch
Brads
Drinking straws


First, cut a square from decorative paper or card stock.  I cut a 5"x5" square, but you can play with the size.

Use the ruler to draw a straight, diagonal line from corner to corner.

Cut along the lines, stopping ~1/4" from the center.

Now, use the thumb tack or small hole punch to make a hole in the right-side corner of each of the four segments.

Make a hole in the center of the square as well.


Now, pull out your collection of brads.


What?  Everyone doesn't have a small collection of brads?  Oh.  Well, I highly recommend checking out your local craft store and starting one.
:)

Now use the holes you made with the tack/hole punch and insert the brad.


Make a hole in a drinking straw, and push the end of the brad through the straw.  Now you can secure the "legs" of the brad, and you're done!


*You could also use a bamboo skewer instead of a straw!  Just secure the brad onto the back of the pinwheel and use hot glue or tape to attach the skewer.  This would make it easy for you to put your pinwheels in the ground, your flower pots, or even your hair.  Why not?


*Note: these pinwheels sadly won't spin in the wind, but they are still incredibly cute!  

Come on, don't deny that you're humming The Star Spangled Banner right now.
Embrace it.

GO USA!!!!!

Have a wonderful and safe holiday weekend!